Rexxar, The Beastmaster
Written by admin on May 15th, 2008 This best-quality guide provided by Suizida and IronFist0.
Rexxar the Beastmaster
By SirFootin and R.I.M.S
Table of ContentsBy SirFootin and R.I.M.S
- Introduction
- All about Rexxar - Beastmasters Stats - Beastmasters Skills - Skill Build
- Item Build - Core Item Build - Optional/Situational Items - After Core Items
- All about Jungling - General Information on Neutral Creeping - Gold and Experience Gain - Creep pulling techniques for the Sentinel forest - Creep pulling techniques for the Scourge forest - Special Spawn Cases ————————————–
- General Walkthrough - Levels 1-10 - Levels 11-16 - Levels 17-25
- Advanced Strategies - Using Primal Roar - Using Wild Axes - Hawk Usage - Quillbeast Usage - How to use Necrominion - Dotakeys
- Allies & Enemies - Allies - Enemies
- Replay & Video Clips -Helpful Links -Conclusion ————————————–
- FAQ
R.I.M.S: When I started originally playing DotA, Rexxar was one of the first heroes I played. That was when Wild Axes and Primal Roar cost a lot more mana, so it was a lot harder then now. I also used to leave out Call of the Wild because I couldn’t micro manage. After some time when I got a lot better I started. I started playing him again and once again I fell in love with him. Then I saw Merlini’s replay as jungle BM against x6. I was amazed at how well it’s done if it is done correctly. I decided to create a guide on Jungle BM, but I didn’t have time to do it by myself. So I asked for help from someone else.
SirFootin: So yes, that someone is me. I don’t really like playing beastmaster much and he pretty much don’t like me playing him either. So R.I.M.S was telling me how cool a jungle BM is and it reminded me of the MYM replay. Cool stuff, and so I decided to help out.
About the Guide:
We will try to make a complete guide on Beastmaster and all possible ways of playing him. With intentions of keeping this guide short however, we will ignore basic information/strategies with regards to general gameplay (eg last hitting, how to animation-cancel etc).
Basically, the kind of Beastmaster hero we want to bring into light is one that starts jungling between levels 1-3 with the aid of a bottle. Rexxar being a powerful ganker (due to Wild Axes and the imba cooldown of Primal Roar) will therefore jungle only till level 6. After which, he will repeatedly go on ganking missions everytime his Ultimate cools down while jungling when it isn’t. Necrominion is the next item of choice as Beastmaster is understandably a weak melee hero for tanking and dishing out raw damage. Being on the support role will fit him better early game. Continuous early game ganking will ensure good map control somewhere during mid-late game and this time is used to transform Beastmaster into either a DPS or a tanking machine if the team requires one.
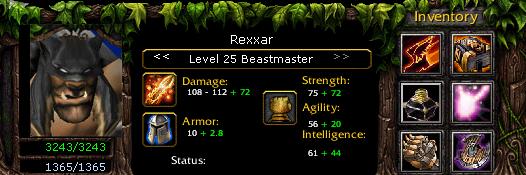
All about Rexxar
Beastmaster’s Stats
Range: 100 | | Move Speed: 310 | Primary: Strength
Str: 23 + 2.2 | Agi: 18 + 1.6 | Int: 18 + 1.9
Damage: 56 – 60 | HP: 587 | Mana: 208 | Armor: 4.5
HP Regen: 0.94 | Mana Regen: 0.65 |Attack Speed: 1.44 (+18%IAS)
BAT: 1.7 | Attack Swing: 0.30
Being a Strength hero, his strength gain is pretty weak. He will be needing a few bracers early game if he wants to lane against harassers. However, that is not required since Jungling is much safer. Gauntlets of Strength would be sufficient to cover for his hp weakness. Good base damage and Attack swing makes last hitting slightly easier though.
Beastmaster’s Skills
Apart from the basic info on the Skills, we have added an Additional Information section too. It may look confusing at first so you might want to read the whole guide first and then return here again to absorb the additional info. You don’t need to memorize all the information here but in an effort to make this guide as detailed as possible, we have provided all the additional information for you.
We have also added a comments section to briefly describe how the skills are being used in-game.
We have also added a comments section just to give a general description of how the skills are used.
 Wild Axes
Rexxar hurls his two axes outward, which then intersect and return to him. Each axe can only damage a unit once.
Level 1 – Each axe deals 90 damage.
Level 2 – Each axe deals 120 damage.
Level 3 – Each axe deals 150 damage.
Level 4 – Each axe deals 180 damage.
Cooldown: 13 seconds.
Level 1: 120 mana, 13 sec cooldown.
Level 2: 120 mana, 13 sec cooldown.
Level 3: 120 mana, 13 sec cooldown.
Level 4: 120 mana, 13 sec cooldown
Rexxar’s sole nuke, but an incredible one to say the least. Wild Axes is Rexxar’s main farming skill and his killing skill early game. When trying to damage enemies with Wild Axes never click on the enemy for the attack, but click in-front of him while assuming in which direction he will be going in. More explained later in the guide.
Additional Information:
- Range is 1300
- AoE radius of each Axe is 150. However since the axe travels at a distance apart, the total width of the AoE is approximately 450-500. Since the axe intersects each other at the turning point, the AoE at the point is minimal. The general AoE when it is thrown will look like a rectangle like most other spells (eg Dragon Salve, Shockwave etc) but tapered near the end.
- Flight time is 3 sec no matter how far you throw it (1.5sec to target, 1.5 back to Beastmaster. It will travel faster if the target is far and very slow if you throw it at a 200range. You will notice that the axe also accelerates as it is being thrown and decelerates as it does a 180 turn)
- Damage is physical. Reducible by armor and damage blocking (eg stout/Vanguard).
- Flight path will change as Beastmaster moves to another position.
 Call of the Wild
Rexxar calls upon wild beasts to aid him. The duration, strength and number of beasts increases per level. Previous summons are removed upon casting.
Level 1 – Summons a Scout Hawk. (60sec duration)
Level 2 – Summons a Scout Hawk and a Quilbeast. (70sec duration)
Level 3 – Summons a Greater Hawk and a Quilbeast. (80sec duration)
Level 4 – Summons a Greater Hawk and a Greater Quilbeast. (90sec duration)
Cooldown/Mana cost: 45/50/55/60 seconds/25 mana at all levels.
Another great skill of Rexxars. A super-movable-observer ward and an awesome slow all rolled into one spell. The Hawk can be used to scout runes and missing heroes, pretty straight-forward stuff. The pig is your greatest ally as he has a constant 35% slow. The advantage of having a your DPS’er and your slower as 2 separate units as oppose into one unit is it makes the opponent choose weather he must disable the slower or the DPS’er. Regardless of his decision, it’s a lose, lose situation for him and a win win for you.
Additional Information:
- Both Hawk and Greater hawk has 25hp.
Hawk vision 500day/500night
Greater Hawk vision is 1600/1200, 315 movespeed (as of v6.46) and has invisibility.
Observer Wards has 1600/1600, equivalent to Greater Hawk’s sight during day. - Quillbeast stats: 400hp | 350ms | 1.0 BAT | 23-29 piercing dmg | 550range | 20% slow for 3 sec
- Greater Quillbeast stats: 700hp | 350ms | 1.0 BAT | 43-49 piercing dmg | 550range | 35% slow for 3 sec
- Piercing dmg does 50% dmg on heroes, 150% on lane creeps (unarmored) making Quillbeast good against them
 Beast Rage
When Rexxar engages an opponent, his animalistic nature grants him even greater proficiency in single combat. With each continuous blow on the same target, Rexxar gains understanding of the prey’s defences, and guides each strike with greater ease than the last. Maximum of 100% increased attack speed. If Rexxar changes targets, his rage counter drops to half of where it was.
Level 1 – Every continuous attack gives Rexxar 5% bonus attack speed.
Level 2 – Every continuous attack gives Rexxar 10% bonus attack speed.
Level 3 – Every continuous attack gives Rexxar 15% bonus attack speed.
Level 4 – Every continuous attack gives Rexxar 20% bonus attack speed.
Passive
The chink in Rexxar’s arsenal. Don’t get me wrong, this skill is good, but only as late game rolls in. It synergises very well with the slow from the pig. While this spell is considered to be given to Rexxar by god himself (Icefrog
 ) to pubbers, it is not viable early since your damage is to low to make it effective, and even during mid game it’s not worth it, due to Rexxars low strength gain. Thus Stats are taken over Beast Rage mid game.
 Primal Roar
The Beastmaster looses a deafening roar which deals damage and stuns its target. Enemy units near the roar wave take minor damage and have their movement speed and attack rate reduced. Due to the force of the roar, all units between the Beastmaster and his prey are shoved aside, creating an open path.
Level 1 – 200 primary damage, 3 second stun. 100 side damage, 2 second slow.
Level 2 – 250 primary damage, 3.5 second stun. 200 side damage, 3 second slow.
Level 3 – 300 primary damage, 4 second stun. 300 side damage, 4 second slow.
Cooldown: 60 seconds.
Level 1: 150 mana, 60 sec cooldown.
Level 2: 175 mana, 60 sec cooldown.
Level 3: 200 mana, 60 sec cooldown.
A very much misunderstood skill. Most players will just use it as a setup stun and during chases. The slow effect is often ignored. In team battles, a well placed roar can make the whole team move to a crawl. This is what Rexxar is truly known for. The damage from Primal Roar is quite negligible for levels 2 & 3 much like Spirit Breaker’s Nether strike. More information on Primal Roar later in the guide.
Additional Information:
- 600 range at all levels
- -50% Movement and Attack Speed at all levels
- Allied units are pushed aside also but will not be slowed.
- Slowed units shows a red Circling-circle on top of their head while the stunned target shows both a red and blue Circling-circle (blue for stun)
- Units behind the roared target will not be affected
- Units who are immune to magic (Repel, Rage, BKB) are stunned by Primal Roar, but they do not take the damage from it.
1. Wild Axes
2. Call of the Wild
3. Call of the Wild
4. Wild Axes
5. Wild Axes
6. Primal Roar
7. Call of the Wild
8. Call of the Wild
9. Wild Axes
10. Stats
11. Primal Roar
12 – 15. Stats
16. Primal Roar
17 – 20. Beast Rage
21 – 25. Stats
Skill Build Justification
Cookie-cutter skill build. Wild Axes is your only nuke, it helps with farming and killing, so it is maxed out early. Call of the Wild is maxed out over Wild Axes because of how the team benefits from the site of your hawk and to have Greater Quillbeast, probably the most dangerous companion you have going into mid game and jungling . Stats are taken over Beast Rage mid game because of Rexxar’s low strength gain for a strength hero, with Rexxar being somewhat of a tank and he can’t use the attack speed effectively. Primal Roar is taken at level 6,11,16 so you can gank enemies.
Item Build

Item Build Justification
The cookie-cutter build for Rexxar. Bottle is taken so Rexxar can constantly have HP and Mana. It gives him the ability to spam Axes early game. Rexxar also works well with the runes which give 2/3 refill after using the rune. Bottle also lets Rexxar run around freely, to gank as he pleases. Gauntlets are taken over Bracers since they are a quicker way of fixing Rexxars low HP. Since our first major item is going to be Necrominion, we would just be delaying a very important item that gives us a relatively good strength boost anyway (+6/+10/+14 str for Necro 1/2/3). Anywhere between 2-3 gauntlets should suffice.
Necrominion is the core item of this build, much like in all Rexxar builds. In my opinion Rexxar is one of, if not the best carrier of Necrominion on the Sentinel side. The synergy with Necrominion and Rexxar is just amazing. The stun from Primal Roar gives you and your minions 3-4 seconds of free hitting. The MS buff synergises well with the slow from you pig for chasing. Obviously you need some decent micro to be able to make this build effective, but don’t avoid if you can’t, practice makes perfect.
Boots of Travel is taken over Treads since Rexxar needs the MS over the IAS. Think about it; Rexxar has a slowing move so he needs an MS to catch up to enemies. He won’t be dealing out much normal hits early game so IAS from Treads is not needed. The MS also helps you save allies. When an ally is being chased by more then one enemy, stun one opponent and slows the rest by 50%. If you can’t catch the enemies then it defeats the purpose Primal Roar. Oh and there’s a 60-second teleport for you to quickly arrive to a battle scene and provide support.
Optional/Situational Items

Optional/Situational Items Justification
Observer Wards:Observer Wards are going to be bought in most cases. Even though you have your Hawk, it’s not enough to see over the whole forest. So we will be showing you where to put wards while jungling later in the guide.
Stout Shield:An optional item. Stout shields are a great way to keep your HP up while neutralling, making you basically immune to normal creeps, they absorb a ton of damage from neutral creeps. One is sufficient. You still need space for other items.
Sentry Wards:A situational item. If you are playing against compotent players will ward the forest when they notice that someone is constantly missing from a lane. They will also put wards into creep camps so that the creeps won’t spawn. That’s when you buy Sentry Wards. By putting wards in the area of trees near the camps you will be able to see the observer wards and kill them off. Make sure that you don’t put your sentry wards on the camp site, otherwise the neutrals can’t spawn and you won’t be able to kill your ward. More explained later in the guide.
Items Afterwards
After Core Items Justification
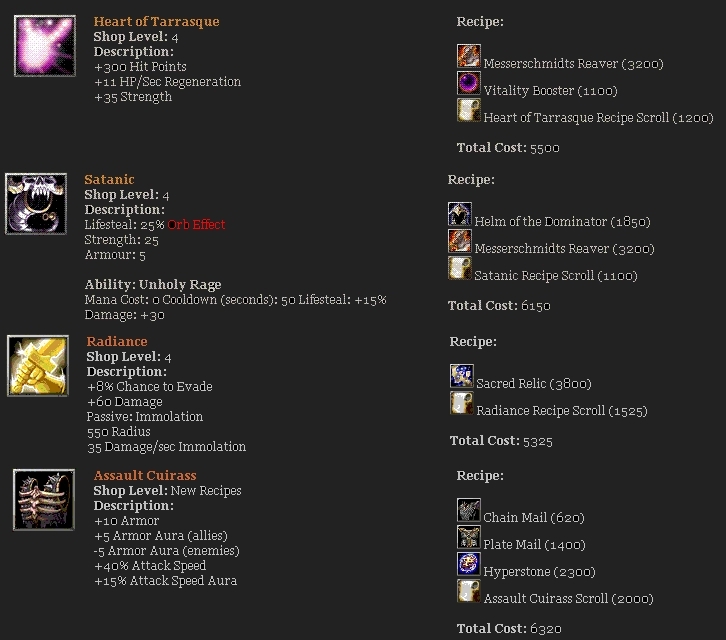
Heart of Tarrasque:If your team who is need of a tank, or you feel that your in need of HP then Heart of Tarrasque would be the best way to go. It gives Rexxar a nice damage boost and a huge HP boost of 965. If your team is in need of a tank early, then skip Necrominion and go Heart of Tarrasque.
Assault Cuirass complements Heart very well. The hugh armor bonus greatly synergises with your large HP pool. It should always be gotten after Heart, to make you an invincible tank.
Satanic:Satanic is a great item for Rexxar. Helm of the Dominator gives Rexxar another creep to control. I suggest a stunner creep (Centaur Khan or Polar Furbolg Ursa Warrior). They help tremendously in ganking. Once you farm up for Mess Reaver and make Satanic you gain a substantial amount of HP (475 HP) a nice amount of lifesteal (25%) and an awesome active ability that synergises amazing with Rexxar. Whether it’s while your chasing someone with you pig or while you’ve stunned your enemy, the damage boost and the extra damage synergises well with Beast Rage. Satanic effectively increases Rexxar’s HP and his damage.
Radiance:Radiance is an item that won’t be chosen too often for Rexxar, since there are many other heroes who buy Radiance earlier. Rexxar is also a hero who needs HP over damage, so HoT or Satanic is a better choice for Rexxar. Although Radiance does provide a bit of tanking capabilities with the 8% evasion. By late game Radiance + Wild Axes will be used for quick pushing and farming. So if no-one else has Radiance and you feel that your HP is enough then Radiance is the item for you.
Assault Cuirass:A new item to Dota, and a very strong one. Assault Cuirass provides a ton of armour and a lot of attack speed. It also gives a nice buff to the rest of the team. The armour reduction from Assault Cuirass synergises very well with Wild Axes, since Wild Axes is physical damage. The attack speed works well with Beast Rage giving Rexxar work up his Rage counter at a faster rate. Like Radiance, if no-one else buys it then it’s up to you to buy it.
It is advisable for you to get this item straight after your Core as AC is a powerful support item.
Manta Style:Usually people go for Diffusal on heroes which does not have a disabling ability. Rexxar doesn’t really need Diffusal but if there are heroes like Warlorck on the enemy team, you might consider getting it to counter his infernals.
Upgrading it to Manta Style next sorta make you into a tanking DPSer. Unfortunately, Beast rage does not work on images because it is a triggered skill. The mana burn works however.
Advantages of Jungling and its Techniques
Before we start off on the strategy section, we shall discuss a little more in detail several Jungle Techniques that will be used as part of the strategy. This section will focus on two parts, information on Neutral Creeping as well as a short video explaining several techniques of neutral creeping.
The first course of the game will require you to do some jungling (as was intended originally in this guide). Rexxar is a sub-par jungler compared to the more popular jungler heroes like Juggernaut and Furion. Nevertheless, it is possible to jungle with him effectively though it will require more skill to do so. The idea of him being in the jungle is because he is less useful in a lane since he is a melee hero. To start off, here are some general information on Neutral Creeping :
General Information on Neutral Creeping
(some quoted from MrX’s guide):
- In an -ap game, neutral creeps spawn at the 2:00min which lane creeps spawns at 1:30
- In a -lm game (or any other form of 1-2-2-2-2-1 games), neutral creeps spawn at the 5:00min while lane creeps spawn at 4:00min. Note that this is a 1:00min difference while -ap is 30secs.
- Creeps spawn at 1:00min intervals
- They will not spawn if there are existing creeps on the camp, sentry/observer wards (common strategy to counter junglers) and corpses.
- Corpses takes approximately 15 secs to decay. 2 secs for the flesh to go to the ground, 12 secs for the bones to decay. If you have your finishing blow on the creep by the 45th sec, a new spawn will appear at the next full minute. Make sure you leave the area though.
- You have to be approximately 500-1000 (in most cases) range away from a creep camp for them to respawn. This includes your own/allied/enemy creeps controlled. If you have a hawk which has vision on the spawn point but is than the range, the creeps will still respawn. However, if you have no vision on the camp but you are less than the range, the creeps will not appear.
- A more correct explanation to re-spawns condition is that each camp has an area bounded by a rectangle. If there exist a unit within the area, it will thus not respawn. The fact that it is not a circular area means that the range required to pull it is not always 1000 but varies since the width/length of the rectangle varies.
- All neutral creeps are set to “Guard mode” and have an Aggro of 300 (a more specific term is Acquisition Range). If you fall within that range, they will chase to hit you.
- Their “Guard” range is 600, ie to mean if they will continue hitting you till they die. If you go beyond 600 range, they will still continue to chase/hit you for 3 secs before they make a 180 turn and head back to their original spot to “Guard”
- Given the 3 sec buffer time to lure the creeps out of the camp, it is possible to lure them out within a 500-1000 range and if done right, a new fresh creep spawn will appear in the abandoned camp. Once the original creeps return, you will have 2 sets of neutral spawns at the same spot. You can have 3 sets or more at the same spot too (but just for laugh only)
- Your lane creeps (Ghoul/Necro or Treant/Talons) have an Aggro of 500 for melee and 800 for ranged. Therefore if there is any neutral creeps hitting/chasing you within that distance, your creeps will ignore their original pathing and help you out.
- Higher level creeps eg Centaur, Furbolgs, Dragons, Roshan etc are often considered ’smarter’ creeps. They have higher target priority over enemies with low health. If you are low on health, be careful not to engage them. You might find them changing targets from and hit you instead.
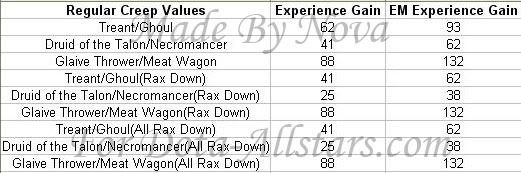
- For an exact computation of what XP/Gold you will receive, use the table below;
-
- Copyright 2007, Nova & Co.
or if you want to know how much XP/Gold gain you received for each kind of camp, refer to
MrX’s Guide : Link Here
Creep pulling techniques for the Sentinel forest
The easiest way to teach someone how to neutral creep is probably, with a video.
Video ExplanationRexxar Jungling Video
The video features Merlini playing as Beastmaster in the famous MYM match versus x6. At the second wave, he did a creep pull to the neutral camps.
The exact timing was 2:15 which was close to perfect. A better illustration is given in the image above.
What caught many by surprise later was how he used a tango to lure the creeps from the 2nd creep camp. Why not use Axe? It sounds like a workable idea but actually there is a deeper meaning to using the tango itself. Firstly, he used it to lure the golems into the 1st camp. Since the distance from that camp is >600, the golems are likely to return back to their original camp (remember >600 distance, 3sec before they return). However, they got caught in between with treants blocking their way. You can see the golems sometimes idling and not hitting because all they want is to go home. The motive of doing so is to force the golems to be >1000 distance from their camps and vhoila, a troll family spawn at the full min!
The next creep spawn pull was demonstrated on the furbolgs. Note the time 3:53min. If you notice, Merlini pulled the creeps down south and exactly at the 4th min they made a 180 and returned to their camp. This is by far a perfect pull.
The next few scenes features the use of wild axes, using it to hit 2 camps at once by using the “throwing and moving behind the enemy” move.
So now you have learnt how to pull creeps at the 53rd sec. Besides the usually stand beside the creep luring method, using your wild axes will also create aggro on the creeps. As of v6.42, there is now a timer (no more open/close of scoreboard to check timing) near your gold indicator. Use that to time for your axe. Since it takes 1.5secs to travel to target, throw it at around the 52nd sec. Besides being able to hit 2 creep camps at once with a single cast of wild axe, you have also created a new spawn on the abandoned camp. Some creeps like Orge Magi and Troll priest however, might hang around the camp casting frost armor or heal and thus cause a problem for the new creeps to spawn due to their close proximity.
Your mana cost on your axe is very costly, doing this will allow you to achieve more kills with as few wild axes as possible. In other words, efficiency.
Creep pulling techniques for Scourge forest
For the Scourge forest, the most efficient area for Jungling is the gnoll camp, the one beside it and the one about 1500 distance directly north of it. In the video, what was shown is a creep pull done on the third wave. Creeps will spawn at the 2nd min and you can usually start pulling them right from the 2nd wave. The advantage for pulling them later is that you get an additional spawn on the 2nd camp (in the case a group of trolls). If you intend to pull during the 3rd wave, you might want to hang around in the mid lane to leech some xp meantime.Scourge Jungle Pull Video
The basic idea is to pull them about 10 secs after they spawn ie in x:10 and x:40 mins as shown in the video. Land 1-2 hits on the gnolls and once you see one of your melee creep turning his back to help you, start to run away from the gnolls. Once they start tanking for you, try grabbing some last hits, meantime watch out for the 52nd sec to throw your axe on the other creep spawn. Remember not to damage the gnolls too much. If the gnolls dies before the creeps on the 2nd camp arrives, your allied creeps might head back to their lanes. To attract aggro on you melee creeps towards the group of satyrs, you need to land a hit on the satyr guys. Your melee creeps will then ignore the gnolls to help you out.
Strangely enough, the 2nd camp does not obey the 1000 spawn rule (quite an exception here). As such, there will be a chance for a respawn even though the distance is just around 700. I’ve tested in the game with Beastmaster standing on the edge of the ramp, the distance between me and the gnoll spawn as well as the satyr spawn is both the same ie 700. The satyrs spawned but the gnolls didn’t. I’ve also noticed another case where it doesnt obey the 1000 range rule. In one scenario, I barely pulled a creep from their camp on the 57th sec, they were only 200 distance away from their camp yet there was another respwan. (Image shown below)
If done correctly, you can easily spearhead your XP level. Remember XP is more important than gold in early minutes of the game. If you were to calculate the XP gain in that video, forest trolls/priests/satyr_tricksters/gnolls gives 41xp each while satyr soulstealers gives 81xp. In total, they give 502xp which is barely enough for you to get to level 3 (needs 500xp for level 3).
Each creep wave of 3 treants/1 talon gives a total of 227xp. For you ally who is soloing Mid lane, assuming the opponent does not deny his creeps (which is rarely the case) he will receive 681xp after 3 waves. If you were to be laning with him, each of you will only receieve 340 xp. Now if the sentinel has a dual laner for mid lane, each of them will have 340xp each too (not accounting for the creeps you pulled/denied). You on the other is getting 502xp which is 50% higher than them. This is prove that proper jungling is as good as a dual laner, if not better.


Special Spawn Cases

So instead of pulling them at x:53, you now have the luxury of pulling them at x:57.

*Try not to pull them diagonally (ie south-east) because then you will need to cover a larger distance to get out of the rectangular area.
A more accurate representation of the respective rectangular boundaries are shown below. Take a look at the two special cases I mentioned and you will understand better. Now you don’t need to memorize all the rectangles but have a general idea of which direction is best for you to pull the creeps to ensure success. For example, when pulling Sentinel ancients camp, it is best to pull them in the southward direction.

Early Game (1-10)

Item Order
Bottle (700)
Boots (500)
Stout Shield (300)
2x Gauntlets (300)
Staff of Wizardry (1000)
Complete Necrominion 1 (1750)
Total Cost: 4550
(note: 1 space can be freed to carry tp scrolls)
When you pick/random Rexxar buy a set of Tango’s and head for mid-lane straight away. Go into the river and cut down the trees next to the tower. This cuts down one of the most effective juking spots on the DotA map (but more on it later), then run back to base(If you randomed Rexxar, buy a bottle now. Sentinel/ Scourge creeps spawn at 1.29, while neutral creeps spawn at 2 minutes. When the second spawn of Sentinel at 2:15, lure the closest neutral creeps to your creeps. Then do double pulls between 2 camps (explained earlier in the guide). Rexxar is one of the few heroes that does require last hitting against neutrals, since a lot of the damage done to neutrals is usually done from sentinel creeps.Boots (500)
Stout Shield (300)
2x Gauntlets (300)
Staff of Wizardry (1000)
Complete Necrominion 1 (1750)
Total Cost: 4550
(note: 1 space can be freed to carry tp scrolls)
Note: For Scourge, you will want to consider the Mid lane. Double pulls are possible as already mentioned in the guide earlier.
At level 2 summon your Hawk and keep him over the rune spot just outside your forest. Off the first set of neutral creeps killed, you should have enough for Bottle. Either have it bought with a chicken or stop by the secret shop to buy one. Bottle helps immensely with jungling, keeping you constantly revitalised with HP and Mana. Runes spawn every 2 minutes after the 2nd minute at either one of the two points (North West or South East from mid lane.) For early game runes are mainly used to fill up bottle, as oppose to using the rune itself (no ramboing at level
 ). If the rune isn’t at your side of the map, alert your team that the rune is on the other side, otherwise another rune doesn’t spawn. In the unlikely case that you are incredibly unlucky and all the runes go to the other rune spot, buy a Ring of Basilius to keep your mana up.
If you want to learn more about runes read MasterJoe’s guide to runes here
At level 3 you get you get another ally, the pig. He isn’t a great ally when he comes to jungling, but he’s great when he it comes to ganking. When you pull neutral creeps out of their acquisition range, use your pig to slow the creep so you can keep hitting them before they start hitting back. Use your pig to tank damage when you’re filling up bottle or to tank creeps if your on low HP. Remember, Call of the Wild costs 25 mana at all levels, so you should always have it active.
From levels 3-5, just do what you were doing before, pulling allied creeps to help out, pulling neutrals out of there camps so others spawn, scout runes, etc. For the lower levels of neutralling, it is quite tough on Rexxar. When trying to kill neutrals, you may not be able to kill them on your first attempt. It may even take 2-3 attempts to kill a group of neutrals depending on what level they are, which ones are there and how many have spawned (due to pulling/spawning manipulation). Beware not to try killing Furbolgs with level 1 axe because its too weak. Furthermore, while you are waiting for cooldown/healing/rune searching, the creeps will be regenerating back to full hp. Also use your Wild Axes to have 2 neutrals camps fighting you, so instead of running around and go to them, they come for you so it’s quicker XP. Remember, if your having trouble luring out creeps then use your Axes to lure them out. If you want double spawns lure out at X:53 or if you want to use your ally creeps to help pull the bottom spawn camp at X:15.
From experience, you will be doing alot of creep pulls as and when it is X:15 (for sentinel) X:10 (for scourge) because you are incapable of killing the stronger creeps. If all goes well, you should reach level 6 by the 11th min in an -ap game. You will level just as fast as a dual laner.
At level 6 you get the most powerful spell in your arsenal, Primal Roar. Since it has an absolutely imba cooldown you have to exploit it. Since you’re in jungle, the enemy will assume that your going to jungle until mid game and you won’t be a worry early game. When you see an opportunity (or make your own) head to bottom/mid lane (make sure you have your hawk scouting the area). Prepare your mana, 150 for primal roar, 120 for Axe. 270 mana in total. Tell your team to stop pushing and just deny, so your enemies are distant from their tower. Either have another ally start with a stun, or you come from behind and use Primal Roar. Obviously use Primal Roar on the hero that’s more dangerous at the time. But that goes without saying that if there’s going to be a hero who will be a nuisance mid/late game that you shouldn’t gank him to. When your gank is done, go back to the forest and start jungling again. This technique should be used everytime Primal Roar isn’t on cooldown to maximise its IMBAness.
For sentinel, your bottom lane is a solo and there is a high chance he will be facing a dual laner. Naturally, they will be pushing towards your tower. So take that advantage of that opportunity to gank every now and then.
Levels 7-10 are all the same things done in 1-6 just easier due to your stat gain. So remember to lure creeps out of camps at X:53. Use your allied creeps from pulls at X:15. Always have your pig and hawk out with your hawk always scouting for runes and ganks. Whenever Primal Roar isn’t on cooldown, go to a lane and gank. This time round, try ganking both mid and bottom lane (for sentinel). Alternate between them. This way, you will create a sense of ‘fear’ in the enemy lines. It is also a good practice to gank different heroes everytime so that everyone will get a gold lost upon death.
Mid Game (11-16)

Item Order
Necrominion 2 (1300)
Necrominion 3 (1300)
Complete Boots of Travel (2200)
Total Cost: 4800
Mid-game is really the time for Rexxar. If you has successfully farmed early game, you should have Necrominion 1 or just about to have it. Your priority is to farm up Necrominion 3 so you can go around doing ganks, where you don’t even need allies. Necrominion will be explained later how to be used. A lot of the same principles from early game are still in mid game. Always have Call of the Wild active, keep checking runes and always have your hawk scouting.Necrominion 3 (1300)
Complete Boots of Travel (2200)
Total Cost: 4800
Since I’m speaking a lot about runes i feel I should add in a section towards how the runes work for Rexxar
QUOTE
mini-guide to Rexxar, the rune whorer. Haste – Works well with Rexxar, works well with ganking. Scout an area with your hawk and proceed to own.
Regeneration – Works well on every hero, either go around ganking or keep your pig tanking and spam axes.
Double Damage – Early to mid game it’s really a average rune, but when you have Beast Rage you are an unstoppable killing machine.
Illusion – Must be used to deceive opponents, but also works well to damage your opponents while stunned from Primal Roar.
Invisibility – Nice rune on Rexxar, get into position for a gank. Just care for invisible counters, otherwise it turns a gank into a disaster.
This is the stage of the game where ganks and team battles really seem to surface. When there’s a team battle, start off with Primal Roar, then use Wild Axes to hit everyone there. Starting off with Primal Roar is much more effective as an opening move as oppose to a finisher since otherwise the slow to all the non-targeted heroes is wasted. Use it on either their disabler or there DPS’er, preferably a range hero. Of course there are special circumstances such as Sand King channeling his Epicenter then naturally you will disable him.Regeneration – Works well on every hero, either go around ganking or keep your pig tanking and spam axes.
Double Damage – Early to mid game it’s really a average rune, but when you have Beast Rage you are an unstoppable killing machine.
Illusion – Must be used to deceive opponents, but also works well to damage your opponents while stunned from Primal Roar.
Invisibility – Nice rune on Rexxar, get into position for a gank. Just care for invisible counters, otherwise it turns a gank into a disaster.
With the extra stat points taken at level 10, 12-15, Rexxar now has some pretty nice HP. When there are no team battles going on hop to a lane and start farming. You can spam Wild Axes now since you gain a lot of intelligence from Necrominion so don’t be strict with your mana capacity.
One thing you may find in mid game is lone heroes. Rexxar is a great 1v1 hero due to all his summons and since your pig has a 35% slow and your Necrominion summons give a 3%/6%/9% buff there is basically no way of escaping (blink would be the only one). Just remember when you use Primal Roar, the pig changes its enemies, so make sure you re-issue his attack command to focus the correct hero. Don’t only go for kills mid game since you need to farm up your Necrominion quickly.
Also remember that you have your hawk, so if you and your team are about to gank the enemy remember to have your hawk scout the area and keep track of the enemy all the time. Be sure to exploit his huge sight range.
Late Game (17-25)
Item Order
Choice of After Core items depeding on -
Tanking: Heart (5500) or Assault Cuirass (6320)
Survivability: Hood of Defiance (2350)
Support: Assault Cuirass (6320)
Support(vs Warlork): Diffusal (3000) to Manta Style (+2500)
AoE DPS: Radiance (5325)
Total Cost: varies
Rexxar truly shines at late game, based on the simple fact he can choose what type he wants to be based on what the team needs. If your team needs a tank, go Heart of Tarrasque, need a DPS’er? Assault Cuirass or Radiance, or if you need something in the middle then Satanic is your choice. Whichever choice you decide to make they all work great.Tanking: Heart (5500) or Assault Cuirass (6320)
Survivability: Hood of Defiance (2350)
Support: Assault Cuirass (6320)
Support(vs Warlork): Diffusal (3000) to Manta Style (+2500)
AoE DPS: Radiance (5325)
Total Cost: varies
Late game though is about team battles and pushes. While there are still some elements of ganking, no-where near as frequent as Mid-game. As before in team battles open up with Primal Roar, team battles are exactly the same. When it comes to pushes, have your summons out also to push and have your hawk go further ahead to see if the enemy is going to defend, if not assume they’re ganking. Remember now you also have BoT, so if you feel a gank coming (or your hawk sees it) go to a different lane and push that one. Rinse & Repeat.
Hero-killing for Rexxar is probably best late game now that he can take full advantage of Beast Rage. The attack speed from beast rage is godly and ought to be feared by his true awesomeness. Beast Rage and Primal Roar together completely obliterates one hero while giving the rest of your team 4 full seconds of owning without getting scratched. Remember to keep using your summons late game, the 35% slow from your pig is invaluable while the sight from your Hawk is also another priceless gift. Just be careful of the really deadly late game hereos (Naga, PL, PA) because they are just too powerful, so try and gank them. If the game goes on for ages, get the items afterwards or be creative, get something like Buriza. and that’s the strategy section for Rexxar.
Advanced Strategies
Using Primal Roar


If you are chasing a group of fleeing heroes, it will be wise to stun the one furthest from you so that the rest who are before him will receive the slow effect. 4 sec slow and 4 sec stun is a long time for you and your team to release your nukes. What makes Beastmaster Ultimate a hot favourite however is that it has a cooldown of 60secs which is absolutely amazing.

Targeting SF or Lina might leave Warlock escape unscathed. On the other hand, if he targets Warlock, he might need to reach closer to him causing him to lose some valuable time. By then, the entire group will have been dispersed and no longer will there be a good opportunity to hit all 4 of them at the same time.
By the way, do make sure that you have allies to back you up after you land your Primal Roar.
Using Wild Axes

The mechanics for Wild axes may seem complicated but actually, they always follow a fixed set of rules. The travel time is always 3.0 secs, 1.5 sec to reach the target and 1.5 for return trip. Everytime you want to throw the axes, always anticipate the target’s new position within a 1.5sec timeframe. With some practice you can easily perfect it in no time. Note that Wild Axes also cuts down trees, which can be used to clear juking spots or create new paths for you to backstab from.
Trees will always regenerate at 5:00 intervals eg 10:00, 15:00, 20:00. Something which is useful to take note of when neutral creeping etc.
Wild Axes is reducable by armor. This is great in a way that heroes have low armor early game (5.5 armor is equivalent to 25% Dmg Red, and also 25% Spell resistance). Henceforth, you should maximize the potential of this spell early game. That, coupled with Roar as you ultimate makes Rexxar a very good ganker hero early in the game.
Some techniques of using Wild Axes has already been demonstrated in the Video, ie hitting 2 creep camps at the same time. Wild axe has a cooldown of 13secs. Usually, a Roar is followed by a Wild Axe. You should have a pig alongside you to slow him down when his stun expires. If he flees, chase him while waiting for Axe to cooldown. Finish him off with another throw.
Before a gank, you might want to throw an axe while hiding behind some trees first before coming out to gank. This allows your axe to cooldown as you come closer to your enemy to Roar him. Unlike the Roar > Wild Axe > Wild Axe method, this Wild Axe > Roar > Wild Axe method allows you to throw another axe around 5-6 secs after roar expires.
Hawk and Quillbeast

Hawk stats:
Small Hawk – 25hp, 350ms 500/500 day/night vision.
(quite useless. only useful for standing stationary at rune points to look out for spawns)
Greater Hawk – 25hp, 315ms 1600/1600 vision. Has invisibility.
Hawks are 1st priority targets for towers, so avoid getting them close to towers or even summoning them beside towers. Like watchers from Nerubian Weaver, Hawks will also die from Radiance effect or Razor’s Lightning storm.
Hawk Usage
For the level 1 hawk, you’d probably only be using him to scout for runes and nothing else. His eyesight is very poor and he has no invisibility. A greater hawk can also be used to scout for runes. You should not put him on patrol however. His speed is rather slow (315ms) as compared to watchers which can effectively scan an area like a radar due to his speed.

This is an example of when you are doing a push. Assuming you are on sentinel side, you might want to place your hawk in that location so that you can view incoming enemies. Apart from that, you can also locate hiding enemies in the trees, eg Pudge, he can be quite deadly when remained unseen). Notice that the hawk has a full 1600 radius vision.
Fighting blind is the worst kind of battle one can think of. Having the upperhand of knowing exactly where your opponents are positioned is a major advantage in pulling off a successful push. In that short amount of time before a clash, your whole team can make a quick assessment on the enemy to look out for their weakpoints, combos they will try to pull, total opponents facing (eg. there could be some heroes hiding in between trees). Its kinda hard to explain, there is no mathcraft to this. As Sun Tzu said, ‘know your enemy and half the battle is won’. Knowing where your enemy exactly is, is part of knowing your enemy.
Of course observer wards can be an alternative but it requires you to plant them ahead of the battle. And that requires an invisible hero or some brave soul to sneak deep into their territory to drop a ward, which is rather risky business.

This one shows the placement of hawks during a base push. All towers have 700 range attack but their True Sight range is 900. Even though it may seem that the tower is not hitting the birdy, be careful. A hero might kill it instead. It’s rather safe to be close to the building shown but i suggest it being positioned a little further, just to be safe.
The whole idea of this placement is of course, to overcome the sight barrier when looking on elevated regions. An alternative method usually is to place an observer ward somewhere near the the edge of the ridge to provide vision. Remember vision is important. You cannot always rely on your creeps to move onto the high ground to provide the vision for you. Your opponents are sure to spam nuke them to death everytime they climb the hill.

If you are Scourge, these are the recommended positions. For top and bottom lanes, you should be able to come up with a good spot on your own. So I won’t be showing those screenies.

To fully exploit the mobility of your hawk, you should try to scout around for their ‘ganking party’. Here above we have a necrowarrior with True Sight, so you have to control your hawk properly. Usually its as simple as right-clicking the enemy hero to make your hawk follow him.
This is a very simple tactic but a very useful one. In games with decent players, you will ocassionally have a lot of heroes missing in the map. They are either hiding in the forests neutralling creeps or roaming around to gank. Your hawk is the primary tool to locate these missing characters! Wards can do the job, but once the heroes have passed the location, they can no longer be tracked. Fortunately, 315ms speed on you hawk is sufficient to keep in pace with most enemy heroes.
Having a ‘realtime’ vision on their heroes, your whole team can easily avoid ganks or even create an opportunity to counter gank. It is all up to you and your team on how to play the game. To be the hunted, or the hunter.

Now this image shows a Sand King being chased by 4 opponents. What he wanted to do is to burrow to safety into the troll camp and tp back home. This is basically a method of trying to ‘juke’ your opponents. He was hoping that once he burrowed, nobody will see him so that he can tp to safety. Unfortunately, the hawk is right above him giving perfect vision of his location. He was zapped by furion and tinker came by to laser/missile nuke him to death, without even going round the tree bend.
This is a rather rare scenario. But most players usually carry a tp scroll and will try to ‘juke’ you whenever they are fleeing. Hawk’s vision will ensure they will never be successful.
QuillBeast Usage

 )
)Ok, erm. Just to reiterate ;
Quillbeast stats: 400hp | 350ms | 1.0 BAT | 23-29 piercing dmg | 550range | 20% slow for 3 sec
Greater Quillbeast stats: 700hp | 350ms | 1.0 BAT | 43-49 piercing dmg | 550range | 35% slow for 3 sec
Piercing dmg does 50% dmg on heroes, 150% on lane creeps (unarmored) making Quillbeast good against them
0.6s Attack point | 0.4s Attack backswing
Like Hawks, they have 350ms. A level 1 quillbeast is already great as a slower especially when you have an ally with you. A greater quillbeast with 35% slow is simply devastating. The great thing about this beast is that they are usually ignored in battles (quite similar to necrowarriors). Players usually focus on killing heroes rather than summons. In that sense, your beast will rarely get stunned or nuked with laguna blade (
 ) making him a perfect hero chaser. His Attack point is a little slow (0.6s). It can be clearly seen as he goes into spasm as he tries to shoot his quill. When left uncontrolled, you will often see him failing to shoot his quill because the enemy has gone too far away. Whenever you have the chance, try to manually control him. Do Animation Cancelling just like any other hero and manuever him around creeps. Getting blocked can make him easily lose his target.
Also note that after you cast Primal Roar, remember to reissue an attack command for him on the target hero. If not, he will simply attack the nearest enemy which in most cases are lane creeps. During the roar, your pig will likely get pushed back/aside also, you might want to make him move as near as possible to the enemy before the stun expires. This way, he will be as close as possible allowing him to land more hits during the duration of the chase.
Quillbeast, like other summons can be targettable for Boots of Travel’s teleport. This is a great way to bring your allies quickly into battle if in any case you get ganked in the forest. On the flip side, you can also use him to bring your allies deep into enemy territory to initiate a gank.
In team battles, you may not always be able to micro-manage all of your units. The most crucial time when you should manually control your pig is somewhere before the clash is over. That is when you will see heroes trying to flee the battle scene. If you do it well, you can slow two heroes at once. One quill for each, then focus on just one while your allies (hopefully there is a stunner in the team) focus on the other. If your necrowarriors are still alive, it will be fairly easy to take the hero down.
Remember that you can share control with your allies. If you aren’t that great at micro-managing your units you allies can always do it for you. In a decent game, one of allies will usually die. Make a point to tell your team, when they die, they shall control the pig for you. This is part of teamplay too.
Strategy Summary
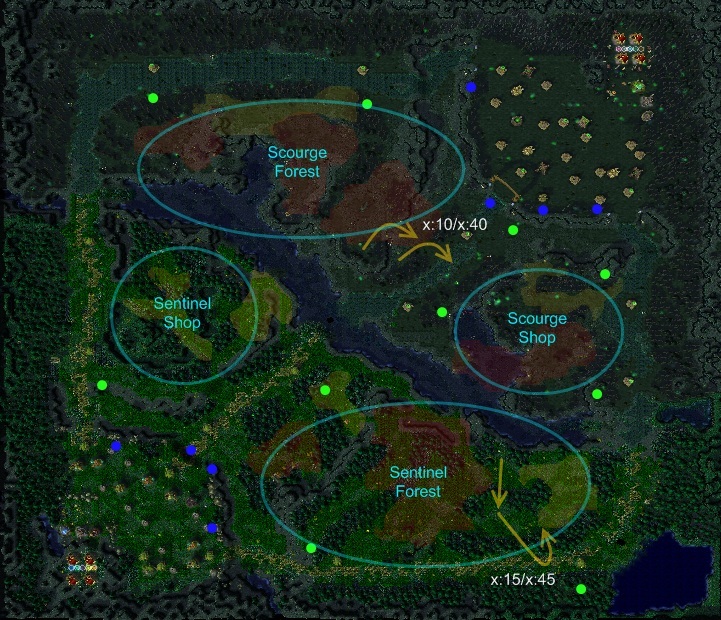
Blue Dots ~ Suggested hawk hovering locations during base pushes
Green Dots ~ Suggested hawk hovering locations during tower pushes
Orange Arrows ~ Creep pulling sites + timing
Translucent Regions ~ Locations where two teams usually meet
Red region: Common regions where heroes clash
Yellow: Less common regions
The other locations not shown in screenshots for placing your hawk during pushes are depicted on the map. Additionally, hawk placement during tower pushes are shown too. Creep pulls which are not explained previously are shown also. The red/yellow regions will give you an overview of where are the common areas where two teams usually meet and clash. With that in mind, you should always prioritze your hawk to scout for the red regions and then the yellow. In games with decent players, you will often see alot of heroes going missing. Observer wards is insufficient to ward the whole forest, you will need something mobile to do the job, hence your hawk.
Guessing where they are located is rather simple. If they are planning for pushes/ganks, there are mostly within your territory. If you are sentinel, try scouting the sentinel forest and the sentinel secret shop area.
In general, teams meet more often in the creep forests rather than near the secret shops regions. Bear that in mind.
How to use Necrominion
Necrominion is an awesome tool to dish out damage. Apart from that, the True Sight gained from a Level 3 book is pretty much invaluable.
Level 1 | Level 2 | Level 3
Melee Unit – 21/41/61 normal dmg, 400/600/800hp 25/50/75 Feedback, 200/400/600 dmg Last Will. True Sight at level 3.
Ranged Unit – 31/61/91 piercing dmg, 400/600/800hp 125/175/225 Mana Burn, 3/6/9% move speed / 3/6/9% attack speed Endurance Aura
Lasts for 30 secs.
Additionally : gives +15/+21/+24 int and +6/+10/+14 str
For a level 1 Necrobook, it will look like this when you group your units together:

To cast manaburn, press ‘tab’ once then ‘r’ for the manaburn hotkey and select the target.
For a level 2/3 Necrobook, it will look like this when grouped together:
To cast manaburn, press ‘tab’ twice then ‘r’ for the manaburn hotkey and select the target.
Be quick in the key movements because in the heat of the battle, you won’t have time to manually select it with your mouse.
DotaKeys
Playing Rexxar will require a little more micro’ing compared to other heroes. Hence I suggest the use of key mapping programs such as Dotakeys. You can find more about it here: DotaKeys
The usefulness comes when having a bunch of units to handle as well as activatable items. With DotaKeys, the hotkey for my Wild Axes will be ‘Q’, Call of the wild is ‘W’ and Primal Roar is ‘R’.

Additionally, I am able to use ‘3′ (the one located above ‘E’) up to ‘6′ as hotkeys for items. I find it much easier to press ‘3′ which corresponds to ‘numpad7′ to cast Necrominion and ‘4′ which corresponds to ‘numpad8′ to drink from bottle. Likewise for ‘5′. The number ‘2′ is reserved for the usual grouping of units. In this case, pressing ‘Ctrl + 2′ will group my pig and Necro warriors and my hero together. ‘1′ is reserved for just my hero.
The program is fully customizable, so you can make it suit your taste.
Hotkeying is very important when playing Rexxar due to his massive amounts of activables. First of all he has 3 active skills, Wild axes, CotW and Roar. Next, he has to control both his pigs and Necro warriors, he has to remember to manaburn the enemy and finally manuever his Hawk to gain the best sight for the team. It is alot of tasks to handle, hotkeying will definitely make it easier.
Beastmaster’s Allies and Enemies
Note: I’m not adding in the obvious enemies. Of course mass disablers and mana burners are your enemies, but they
are for everyone. So here are some allies and enemies beyond the obvious
Allies of Beastmaster

These heroes help Rexxar soak in the damage he is inevitably going to receive after he uses Primal Roar.
Barrier and Repel are great spells for tanking and help you when your escaping.

When the enemies are stunned their is nothing like having a DPS’er come to help you drop the enemies. The
Imbaness of this combo makes opponents go cry to their mothers.

These heroes keep Wild Axes stronger for the duration of the game. How? Since Wild Axes is a Physical spell, it is reduced by armour. Since they keep the enemies armour low, it makes Wild Axes a viable nuke in the later stages of the game.


These heroes depend on your Hawks vision for there spells to work. With both these heroes at night having less sight than the range of the spells, it is your job to put you Hawk ahead so they can land there spells and see any upcoming danger. I would suggest giving them true sight so you have don’t have to worry about putting the Hawk in the right spots.

Shadow Fiend gets a special mention as Rexxar’s allies. His Aoe armour reduction synergises well with Wild Axes and with Beast Rage. His 3 Shadowraze’s work well with Primal Roar to do some massive AOE damage (1200 altogether). His DPS helps take down your targetted hero. And of course his AOE ultimate slows everyone to get you into a perfect position for Primal Roar or vice-versa.
Enemies of Beastmaster


Any Radiance carrier heroes as well as Razor will kill off your hawk instantly. Be sure not to tail/follow such heroes with your hawk.

Armour raising heroes make Wild Axes substantially weaker earlier during the game. Sven is worse for farming purposes, While Lich is worse for killing purposes (due to the slow from Frost Armour).
These heroes can keep constant site of Rexxar after level 6, thus making it impossible to jungle.

These heroes have site around the whole map. They can check every spot on the map to see if your there, once again making it impossible to jungle.

While a single target stunner (eg Vengeful Spirit) can’t stand up to you and your army, a well placed AOE stun can stop you and your summons, for an easy get away. Always be careful against AOE stunners as they can change the hunted into the hunter with one spell.

Obsidian Destroyer gets his own section. His Arcane Orb damages your minion +400 due to the fact that they’re summons. Astral Imprisonment keeps Rexxar out of commission for a long time and Sanity’s Eclipse kills you or takes all your mana.
Replays & Video Clips
If you didn’t see it before you can see all the tactics shown in this guide in this video here here. This is all the neutral creeping strategies covered in this guide, demonstrated by Merlini. Created by SirFootin
League Replays:
Here’s the replay that showed R.I.M.S how to play jungle Rexxar. This is done by one of the best players of DotA presently, Merlini
 TFL_Week_9___x6_vs_1_._MYM.w3g ( 1.5mb ) Number of downloads: 4376
Sentinel (MYM)
 MYM|p0c (Top)
 MYM|H4nn1- (Mid)
 MYM|LevenT (Bot)
 MYM|Maelk (Jungle)
 MYM|Merlini (Jungle)
Scourge (x6)
 x6.Tiger (Top)
 x6.merc (Top)
 x6.Lion (Mid)
 x6.YoDa (Bot)
 SunCrusher- (Bot)
Inhouse Replays:
None at the moment.
Pub Replays:
The purpose of jungling is basically to take advantage of the untapped resources in the Sentinel/Scourge forest early game. Beastmaster is like Juggernaut, he needs to level fast to 6 so that he can go around ganking with his ultimate. In the subsequent replays, I have included the timing in which BM reaches level 6.
Sentinel Beastmaster
beastpub_hgc.w3g ( 847.1k ) Number of downloads: 737Playing a jungle may be a little hard because it is highly dependent on your allies. Now that you have 2 solo, there is higher chances that one of the lanes will fail. Fortunately, my team was able to manage it well. The early minutes of the game shows a lot of beastmaster jungling techniques. There are lots of double spawns happening but remember when throwing axes, try as far as possible to be within the 1000 exp range. There were lots of instances where xp was wasted in this game, what a bummer. BM is pretty much a team-player using this build, so I wasn’t really expecting much kills.
The game ended with a Boot of Travel, Necro3 and Bottle.
Level 6 at 11:15 min
Scourge Beastmaster
beastpub_scourge.w3g ( 522.3k ) Number of downloads: 847Sentinel Line up (Score: 9)
 1-2
1-2 3-4
3-4 1-4 3-4
 1-5
1-5Scourge Line up (Score: 19)
 5-3
5-3 1-1 4-1 (me!) 5-1 2-3
This replay teaches you how to play Beastmaster in the Scourge team. Surprisingly, it is much easier to jungle as Scourge since the camps are more clustered together. I managed to get to level 6 by the 9th min which is surprisingly good. Again, the replay shows alot of jungling techniques and the rest of the game shows how the little pig, hawk and necro boys rules the game.
Level 6 at 9:00 min
(much better than in Sentinel)
Helpful Links
Here are the links we used that we used to help us make our guide. Thankyou and we really appreciate it.
Runes by MasterJoe – here
Creeps by MrX – here
Jungling by DarkMilkShake – here
Creep pulling by thisisbob – here
Nova Exp Guide – here
Conclusion
And that’s our guide. We hope to have shown you how to play Rexxar, and how to properly jungle with Rexxar. We would like any questions/constructive critisism posted so our guide evolves and can only get better. The guide ends here.


No comments:
Post a Comment